This post describes how to set up a Raspberry Pi using the Rasbpian distribution. In general there is a useful installation guide already available. Based on this guide, this post shows some additional steps, which might be useful after the basic system setup.
Please keep in mind, that this post shows only my personal experience with the specific hardware and software I used. For this reason I cannot accept any responsibility or liability in case anything is damaged. Please understand this post as a collection of - hopefully - helpful tips, which is by far not complete.
Download the image
First of all, you need to download the official Raspbian Lite image provided here. Currently this is Raspbian Strecht Lite. For getting access to the contained image file, please unzip the downloaded archive to a local directory (e.g. by using 7-Zip).
Write the image to the SD card
Nowadays you only need to download and install a tool called Etcher for being able to write the zipped image to a SD card. You can download the tool from the Etcher website. It is available for Mac and Linux as well as for Windows.
If you use Windows 10, it might be the case that a permission error like the one below is shown.

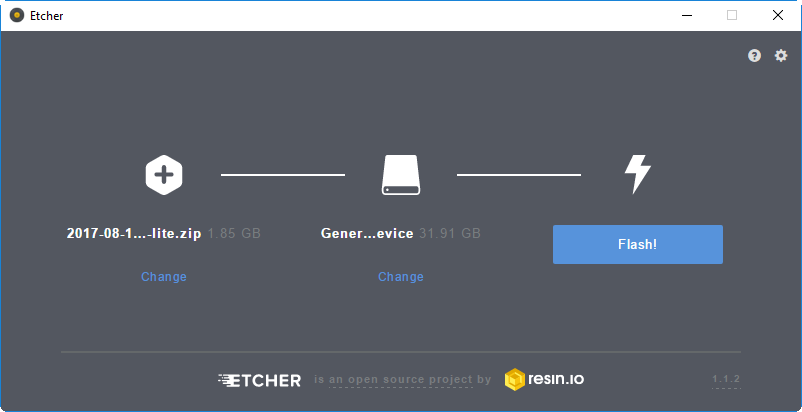
For solving this issue, you need to start Etcher with administrative privileges. Once started successfully, you need to select the image archive downloaded before. Afterwards the target drive needs to be selected. After double checking those settings, you can start the flashing process.

You can close Etcher and eject the SD card as soon as the finish message is shown.
Start the system and log in
After the system image was successfully written to the SD card, you need to place the SD card in your Raspberry Pi and start it. For doing the setup, please connect a screen and a keyboard. As an alternative, you can connect using a TTL to USB converter as described in a previous post.
Once the system is ready, you can log in using the default credentials. The default username is pi and the default password is raspberry.
Create a new sudo user
As a good practice, you should create a new user for yourself and - very important - delete the default one. The new user should be part of the sudo group. After the user exists, you should set the password and exit the session.
pi@raspberrypi:~$ sudo useradd -m -s /bin/bash dummyusr --groups sudo
pi@raspberrypi:~$ sudo passwd dummyusr
pi@raspberrypi:~$ exit
The new user should replace the default one. For being able to remove the predefined one named pi, the previously performed log out is needed. Open a new session with your new user and delete the old user.
dummyusr@raspberrypi:~$ sudo userdel -r pi
Update system settings
There are some more useful settings you should configure. The easiest way to do this, is using the raspi-config tool.
dummyusr@raspberrypi:~$ sudo raspi-config
I suggest to configure the following things:
- Hostname
- Locale
- Timezone
- Keyboard layout
- Wifi country
Afterwards a reboot is needed. Once the system is back online, the settings will be active.
Establish the network connection
The last step in the setup described here is setting up the network connection. This is of course simple, if you plan to use an ethernet connection and dynamically assigned IPs. The description here focuses on the enhanced use case of connecting to a wifi network using a static IP address. For further details (e.g. hidden wifi networks etc.) you should have a look at this guide.
If you would like to connect to your local wifi network, there are some necessary steps to do. First of all you should scan for reachable wifi networks. The commands below assume, that you use the interface named wlan0, which is e.g. the case if you use the onboard wifi chip of the Raspberry Pi. This name might differ, if you use another interface.
dummyusr@raspberrypi:~$ iwlist wlan0 scan | grep ESSID
                    ESSID:"FRITZ!Box 6360"
                    ESSID:"WLAN-E71X60"
                    ESSID:"FRITZ!Box 6490 Cable"
                    ESSID:"WLAN-833491"
If the desired network is listed, your Raspberry Pi is able to reach it. The desired one here uses the SSID WLAN-833491.
Now we need to configure this network. The SSID and the passphrase need to be specified. For security reasons, you should encrypt the passphrase first by using the wpa_passphrase command.
dummyusr@raspberrypi:~$ wpa_passphrase "WLAN-833491" "verysecretpassphrase"
network={
        ssid="WLAN-833491"
        #psk="verysecretpassphrase"
        psk=d2453687b26a9d982b4609988fdb78c6f2248fd925f65bb304ee62a8bd91d89d
}
The output needs to be appended to the relevant configuration file. Please make sure to delete the commented out line containing the unencrypted passphrase.
dummyusr@raspberrypi:~$ sudo vi /etc/wpa_supplicant/wpa_supplicant.conf
For setting a static IP address I used dhcpcd. So first check, if the service is active.
dummyusr@raspberrypi:~$ sudo systemctl status dhcpcd
If the service is not active, enable and start it by using the commands listed below.
dummyusr@raspberrypi:~$ sudo systemctl enable dhcpcd
dummyusr@raspberrypi:~$ sudo systemctl start dhcpcd
For setting the static IP address, you need to edit a configuration file.
dummyusr@raspberrypi:~$ sudo vi /etc/dhcpcd.conf
Please add lines similar to the ones shown below and remember to replace the values with the ones you need.
interface wlan0
static ip_address=192.168.1.2/24
static routers=192.168.1.1
static domain_name_servers=192.168.1.1
After the configuration is done, you should reboot the device.
dummyusr@raspberrypi:~$ sudo reboot
Once the device is up and running again, you can check, if the connection to the network was established. If the interface configuration shown after running the command below contains the static IP address you specified, the device successfully connected to the wifi network. Please replace the interface name, if it is not wlan0 in your case.
dummyusr@raspberrypi:~$ ifconfig wlan0 | grep "inet addr"
inet addr:192.168.1.2  Bcast:192.168.1.255  Mask:255.255.255.0
Install latest system updates
As last step in the configuration process described here, you should install the latest updates.
dummyusr@raspberrypi:~$ sudo apt-get update
dummyusr@raspberrypi:~$ sudo apt-get upgrade
Further steps
This post described some additional configuration steps, which are useful or necessary from my point of view.
Nevertheless, this might not be complete in your use case. If you are planning e.g. to expose your device to the internet, you need to take care of further, security relevant topics, which were not described here.